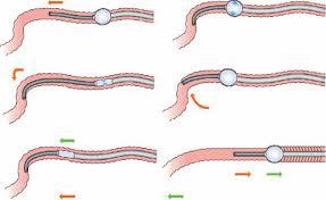
Hemorrhoid Banding: What to Expect

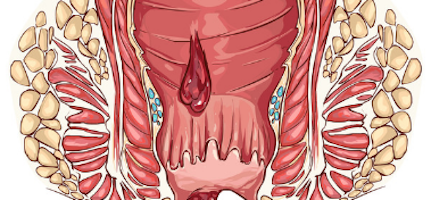
Hemorrhoids are swollen veins in the lower rectum or anus. They can cause bleeding, itching, and pain. While most hemorrhoids resolve with home treatment, some can be harder to get rid of. There are several non-invasive treatments for hemorrhoids. In cases of highly symptomatic hemorrhoids, banding is one approach that can help. Here’s what you need to know about hemorrhoid banding.

When Hemorrhoid Banding is used

As mentioned above, in cases of highly symptomatic hemorrhoids, hemorrhoid banding (sometimes called rubber band ligation) may be used. These symptoms include severe pain, severe bleeding, prolapsing (protrusion through the anus), and hemorrhoids with blood clots. Hemorrhoid banding is a non-invasive, non-surgical procedure that cuts off the hemorrhoid’s blood supply. Eventually, the hemorrhoid falls off as a loss of blood supply.

Before the Procedure

In the days leading up to the procedure, your doctor may ask you to stop taking certain medications. These include ibuprofen, aspirin, or any other drug that makes it difficult for blood to clot. Your doctor may also perform some diagnostics prior to the procedure to identify the hemorrhoid and its state. This may include a physical examination, a rectal examination, a sigmoidoscopy, or an anoscopy.

During the Hemorrhoid Banding Procedure

The entire hemorrhoid banding procedure only takes about five minutes. During the procedure, your doctor will place a tube-like instrument in your anus so they can examine the hemorrhoid. They will then put a tight rubber band around the base of the hemorrhoid. This cuts off the blood supply. You may experience some discomfort during the procedure.

After the procedure

After your doctor performs the hemorrhoid banding, your doctor will advise you regarding recovery and may schedule a checkup or another appointment. You may need multiple bandings to remove a hemorrhoid. Hemorrhoids may take around a week to fall off after a successful banding procedure.

In the days following your procedure, you may have some difficulty with controlling bowel movements and passing gas. Fortunately, there are a few things you can do at home to help with this. For one, make sure you move your bowels right when you feel the urge to do so. Do not sit on the toilet for long periods of time, and don’t strain during bowel movements. To avoid constipation and straining, eat lots of fiber, stay hydrated, and exercise. Additionally, you should avoid heavy lifting for two or three weeks.

While serious complications are rare with this procedure, there are a few signs to look out for after your hemorrhoid banding. These include any signs of infection (like fever or chills), passing a lot of blood, having uncontrollable pain, having trouble urinating, and developing an aching feeling between the rectum and genitals. Call your doctor if any of these symptoms develop.

Our experienced team at GHP has years of experience performing hemorrhoid banding. We can help establish the best plan of care for your situation. Contact any of our office locations to learn about the options we offer and schedule an appointment today.

Breath Testing

Breath testing is a noninvasive method doctors can use to diagnose gastrointestinal conditions. Here’s what you need to know about breath testing. 

Breath Testing 

Breath testing gives doctors a noninvasive way to diagnose several conditions. They can analyze your breath to detect amounts of particular gases, making diagnosis quick and simple. Typically, there are a few pre-testing steps you will need to follow, including consuming particular liquids and avoiding certain activities before or during breath testing. The specifics for each type of breath testing are discussed in the following sections. 

Bacterial Overgrowth Breath Test

This test is used to figure out if there is too much bacteria growth in the small intestine. This sort of overgrowth can prevent your body from absorbing nutrients properly. In the day prior to this test, you will need to limit your consumption of slow-digesting foods like beans and pasta. You will also need to fast for 12 hours before testing, and should not sleep, smoke, or exercise vigorously directly before or during the test. Additionally, you should avoid chewing gum, having mints, using mouthwash, or brushing your teeth the morning of. Stop using probiotics for the two weeks leading up to testing as well. You need to reschedule the testing if you have been taking antibiotics within 48 hours. Finally, you may consume water up until the time of testing, but you can’t eat or drink during the test. 

During Bacterial Overgrowth Breath testing, you will first breathe into a small machine. Then, you’ll consume a lactulose solution (this may cause abdominal pain or diarrhea for some people). 90 minutes later, you will breathe into the machine again. Last, you will wait an additional 30 minutes and breathe into the small machine. 

Fructose Breath Test

Fructose testing helps determine whether you may have trouble absorbing fructose. Symptoms like gas, bloating, diarrhea, and cramping can be a sign of fructose malabsorption. Fructose is a sugar that is in many plants you may consume, like onions, artichokes, and pears.

Preparation for this test is similar to the aforementioned testing. The day before the test, you need to limit consumption of slow-digesting foods. Stop taking medications leading up to the test. You must fast for 12 hours before testing, and shouldn’t smoke, sleep, or exercise vigorously right before or during testing. Also, you should not chew gum, use mouthwash, brush your teeth, or have mints the morning of testing. You may consume water up until the time of testing, but you can’t eat or drink during the test. Finally, you should let your doctor know if you have taken antibiotics recently or if you have been having diarrhea. 

Three hours prior to the testing, you will need to consume 12oz of Coca-Cola. When you arrive for the test, you will breathe into a machine that will measure for hydrogen gas. You will breathe into the machine in 30 minute intervals for three hours. 

Pylori Breath Test

H. Pylori breath testing helps doctors detect the presence of H. Pylori bacteria in your stomach or small intestine. This bacteria can cause diseases and increase your risk of gastric cancer. Two common conditions associated with the bacteria are gastritis and gastric ulcers. 

To prepare for H. Pylori breath testing, you should stop taking proton pump inhibitors like Prilosec OTC or Nexium. These can lead to false readings. You will also need to stop taking antibiotics two weeks before testing. Additionally, you should stop taking Sucralfate, Pepto-Bismol, and Carafate. Finally, you will need to fast for the hour leading up to the test. 

During testing, you will first give a breath sample. Then, you will drink a Pranactin-Citric solution and give another breath sample 15 minutes later. 

Lactose Breath Test

Lactose breath testing helps diagnose lactose intolerance. This intolerance prevents you from being able to digest lactose (a sugar found in milk) properly. Common symptoms of this intolerance are bloating, gas, cramping, and diarrhea after consuming dairy products. 

Preparation for this testing is similar to preparing for a Bacterial Overgrowth or Fructose test. The day before testing, you will need to limit consumption of slow-digesting foods like beans and pasta. You also need to fast for 12 hours before testing, and should not sleep, smoke, or exercise vigorously directly before or during the test. Additionally, you should avoid chewing gum, having mints, using mouthwash, or brushing your teeth the morning of. You will need to be off of any antibiotics for two weeks before testing. You may consume water up until the time of testing, but you can’t eat or drink during the test. Tell your doctor if you have had any recent diarrhea, as this can affect testing. 

Three hours before the test, you will need to consume 12oz of skim or fat-free milk. During the test, you will need to drink a beverage with lactose. This can cause intolerance symptoms. After this, every fifteen minutes, you will blow into inflatable bags that will be tested for hydrogen levels. An elevated hydrogen level means that lactose is not digested properly. 

Our experienced team at GHP has years of experience performing breath testing. We can help establish the best plan of care for your situation. Contact any of our office locations to learn about the options we offer and schedule an appointment today.


GI Luminal Stenting

GI Luminal Stenting is a procedure that inserts a stent in the GI tract to relieve obstruction. Here’s everything you need to know about the procedure. 

When it’s used

GI Luminal Stents can relieve obstructions in the GI tract. Obstructions are caused by numerous diseases, like GI cancers. They can cause blockages of food, fluid, and waste, and lead to symptoms like vomiting, nausea, and severe abdominal pain. This can be life-threatening in some cases. Surgery used to be the only option to relieve obstructions. Fortunately, stents now provide a less invasive method. 

Preparing for GI Luminal Stenting

To prepare for stenting, there are a few pre-operative steps you may need to take. For lower GI stenting, you will need to adhere to a cleansing routine leading up to the procedure. This consists of a liquid laxative you will take the day before the procedure, preparing your bowels. You will also be instructed to consume only clear liquids the day before, and drink lots of fluids in general. For upper GI stenting, you may be asked to stop eating the midnight before the procedure.

You will also need to discuss any medications you are prescribed with your doctor. It’s especially important to mention any blood-thinners you are taking. These increase the risk of excessive bleeding, and you will need to stop taking them before the procedure. Additionally, if you use insulin, you will need to adjust your dosage and timing leading up to the procedure. 

During the procedure

Directly before your procedure, you will go to a pre-operation area where nurses will place an IV and take your medical information. You will also talk with an anaesthesiologist about the sedation used during the procedure. Machines will monitor your vitals throughout the stenting procedure. 

Your doctor will place the stent by using an endoscope. Depending on if the stent is being placed in the upper or lower GI tract, an endoscopy or colonoscopy will first be performed to evaluate the area. Once the blocked section is examined, the stent will be placed through the endoscope. 

Stents are simply hollow tubes made of flexible wire that is tacked to a mesh. The stent will be advanced through the endoscope with a guide wire. When it is positioned, your doctor will expand the stent to help open the obstruction. 

After GI Luminal Stenting

You will go to a post-operation area following the procedure. There, nurses will monitor you for any signs of complications from the sedation or procedure. Once you are recovered, your doctor will discuss preliminary findings with you. Some findings (like those from biopsies) may take several days to come back. 

You shouldn’t drive, operate machinery, or make important decisions for 24 hours following the procedure due to potential lingering sedative effects. You should also follow a clear liquid diet for a few days following the procedure, eventually transitioning to a bland diet. You’ll formally receive all of these instructions before you leave. 

Complications from GI Luminal Stenting are rare. Perforation occurs in less than 5% of cases, and requires surgery to repair. Stents can also migrate on rare occasion. When this happens, patients experience obstruction symptoms again, and should contact their doctor to remove or replace the stent. 

Our experienced team at GHP has years of experience performing GI Luminal Stenting. We can help establish the best plan of care for your situation. Contact any of our office locations to learn about the options we offer and schedule an appointment today.


Single Balloon Enteroscopy: A Closer Look

Single Balloon Enteroscopy is a procedure that allows doctors to examine the small intestine. Follow along for everything you need to know about the procedure.

When Single Balloon Enteroscopy used

A Single Balloon Enteroscopy is used to examine, diagnose, and treat diseases in both the upper and lower GI tract. The advantage of the procedure is that it gives access to the entire small intestine, which is around 20 feet long on average. Other procedures cannot provide reach to effectively examine or treat the small intestine. The Single Balloon Enteroscopy lets doctors get access and live imaging of parts of the GI tract that are otherwise inaccessible. This is important for examining sources of GI bleeding, taking biopsies, removing polyps or foreign objects, and enlarging strictures.

Preparing for the procedure

There are a few important pre-operative steps you need to take prior to a Single Balloon Enteroscopy. You will need to discuss any medications you are taking with your doctor. Certain blood-thinning medications can pose risks of excessive bleeding during the procedure. Additionally, if you take insulin, you may need to adjust timing and dosage leading up to the procedure.

You will need to adhere to a clear liquid diet the day before the procedure. You will also be asked to refrain from eating starting the midnight before the procedure. In addition to these steps, you will need to use a cleansing routine the day before your procedure. This entails a liquid laxative that clears and prepares your bowels for examination. Your doctor will give clear instructions for all of these important steps leading up to your Single Balloon Enteroscopy.

During Single Balloon Enteroscopy

On the day of your procedure, you will first check in to a pre-op area where nurses will place an IV and take medical information. You will also meet with an anaesthesiologist to discuss sedation during the procedure.

The procedure takes around 60-75 minutes total. Your doctor will use a balloon system consisting of a flexible endoscope with a camera, an overtube, and an attached inflatable balloon at the tip of the overtube. They first insert the endoscope down your throat and into your intestine (you will have a mouthguard to protect your teeth and the endoscope). They will inflate the balloon to anchor the overtube, and then advance the endoscope further into your small intestine. Cyclically, they can then deflate the balloon, advance the overtube, reinflate the balloon, withdraw the overtube to shorten and straighten your small intestine, and advance the endoscope further. This pleats the small intestine over the overtube, shortening the small intestine’s length.

The endoscope is also able to inflate your intestine, rinse it with water, and guide biopsy and cautery instruments. Since you will be sedated, given pain medications, and given a local oral anaesthetic, the procedure is pain-free.

After the procedure

Following the procedure, you will return to a post-op area to recover from sedation. Nurses will monitor you for potential complications. After recovery, your doctor will discuss findings with you, although some results for biopsies and polyp removal can take a few more days to be finalized). You should not drive, make important decisions, or operate machinery for 24 hours after the procedure due to sedative effects.

You may feel bloated for a few hours after the procedure, which is normal. There are few severe complications and risks associated with Single Balloon Enteroscopy. On rare occasions, the procedure can cause perforation, excessive bleeding, and complications from sedation. If you experience excessive rectal bleeding, severe abdominal pain, or a fever, contact your doctor immediately.

Our experienced team at GHP has years of experience performing Single Balloon Enteroscopies We can help establish the best plan of care for your situation. Contact any of our office locations to learn about the options we offer and schedule an appointment today.